1. Spring Security 개념
스프링 기반의 애플리케이션의 보안(인증과 권한)을 담당하는 프레임워크입니다.
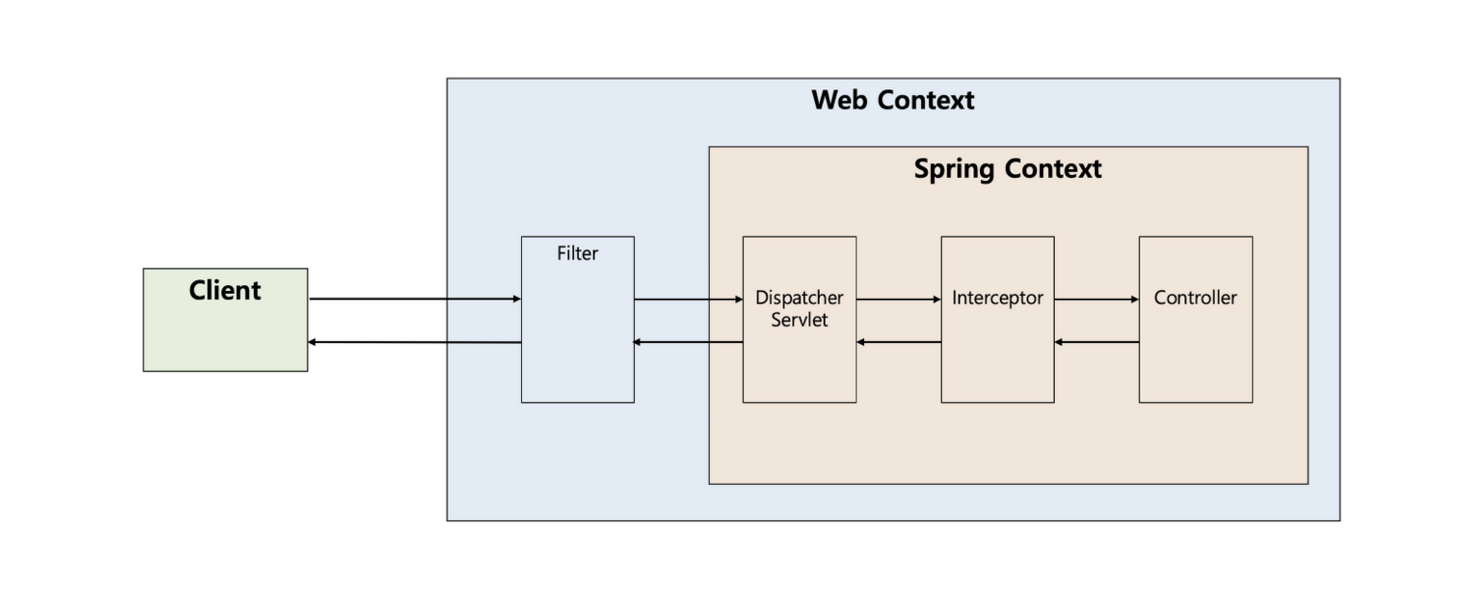
스프링 시큐리티는 필터(Filter) 기반으로 동작하기 때문에 스프링 MVC와 분리되어 관리 및 동작합니다.
필터(Filter)는 Dispatcher Servlet으로 가기 전에 적용되므로 가장 먼저 URL 요청을 받지만, Interceptor는 Dispatcher와 Controller 사이에 위치합니다. 그래서 이 둘은 적용 시기에 차이점이 있습니다.

Client (requset) -> Filter -> DispatcherServlet -> Interceptor -> Controller 순입니다.
뒤에 설명에서 계속 나올 용어에 대해 먼저 정리해보려 합니다.
💡용어
1. 접근 주체(Principal) : 보호된 대상에 접근하는 유저입니다.
2. 인증(Authentication) : 인증은 '증명하다'라는 의미로 예를 들어, 유저 아이디와 비밀번호를 이용하여 로그인하는 과정입니다.
3. 인가(Authorization) : '권한부여'나 '허가'와 같은 의미로 사용됩니다. 즉, 어떤 대상이 특정 목적을 실현하도록 허용하는 것을 의미합니다.
4. 권한(Role) : 인증된 주체가 애플리케이션의 동작을 수행할 수 있도록 허락되었는지를 결정할 때 사용합니다.
2. Spring Security Filter

위에서 스프링 MVC에서는 요청을 가장 먼저 받는 것이 DispatchserServlet이라고 했습니다. DispatchserServlet가 요청을 받기 전에 다양한 필터가 있을 수 있습니다.
필터가 하는 역할은 클라이언트와 자원 사이에서 요청과 응답 정보를 이용해 다양한 처리를 하는데 목적이 있습니다.
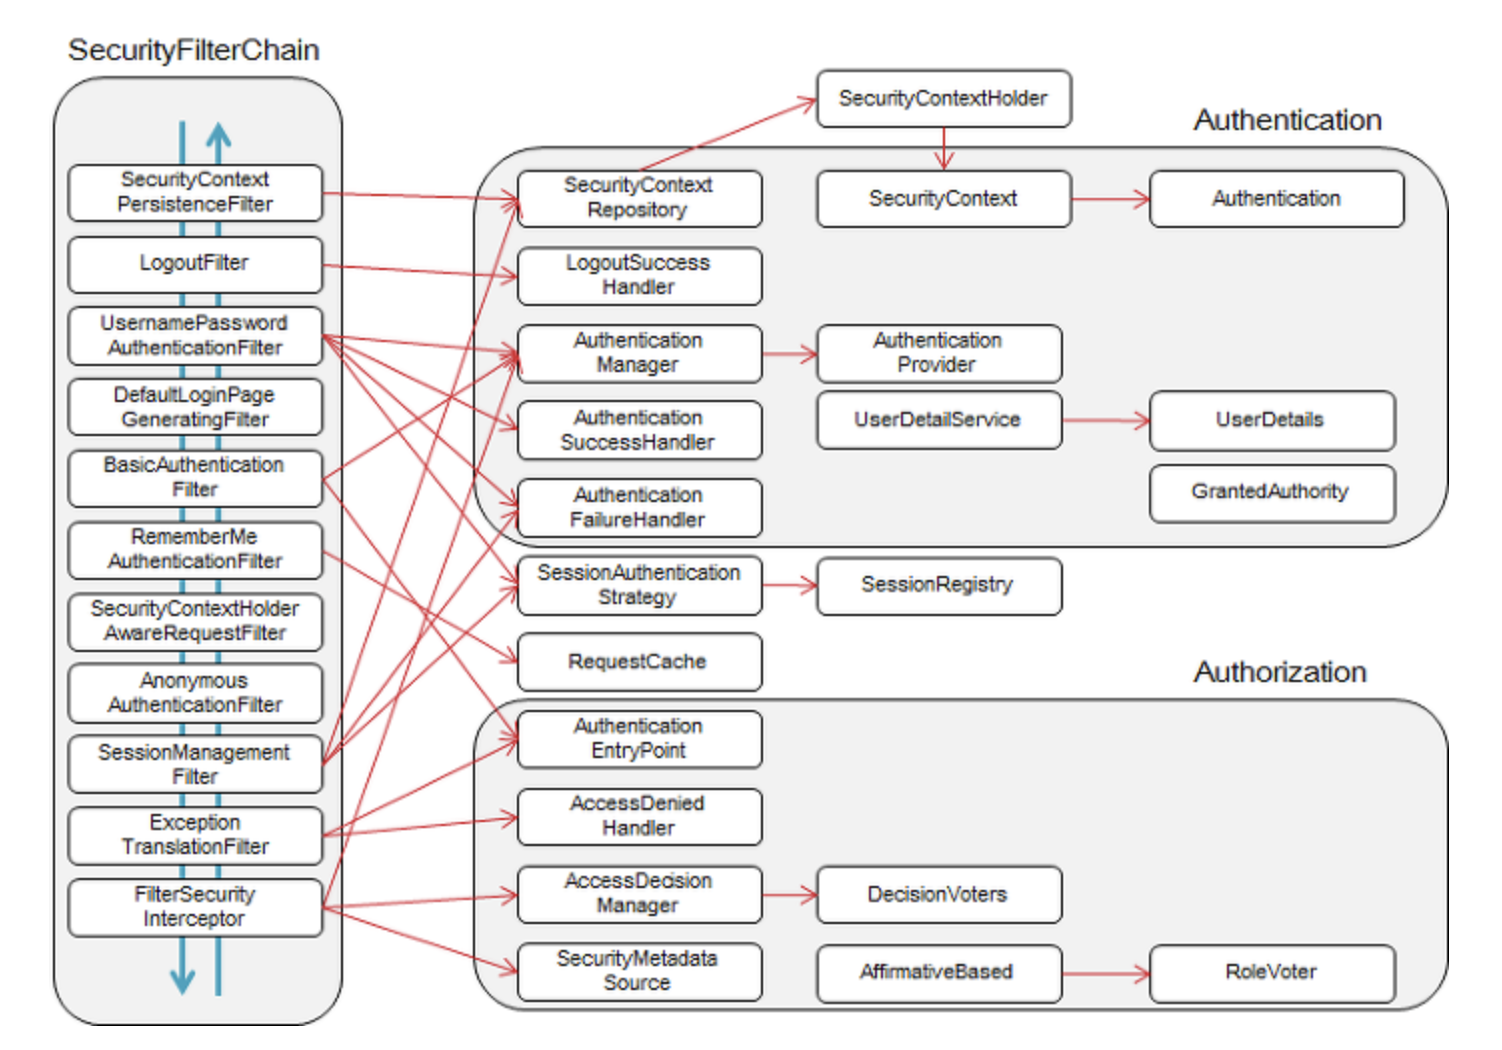
a. Security Filter Chain

Spring Security는 다양한 기능을 가진 필터들을 10개 이상 기본적으로 제공합니다. 이렇게 제공되는 필터들을 Security Filter Chain(시큐리티 필터 체인)이라고 합니다.
3. Spring Security 주요 모듈
a. Authentication
public interface Authentication extends Principal, Serializable {
    Collection<? extends GrantedAuthority> getAuthorities();

    Object getCredentials();

    Object getDetails();

    Object getPrincipal();

    boolean isAuthenticated();

    void setAuthenticated(boolean isAuthenticated) throws IllegalArgumentException;
}
현재 접근하는 주체의 정보와 권한을 담는 인터페이스입니다.
b. SecurityContext
Authentication을 보관하는 역할을 하며, SecurityContext를 통해 Authentication 객체를 꺼내올 수 있습니다.
c. SecurityContextHolder
보안 주체의 세부 정보를 포함하여 응용프로그램의 현재 보안 컨텍스트에 대한 세부 정보가 저장됩니다.
💡 Authentication, SecurityContext, SecurityContextHolder의 관ㄱ
1. 유저가 로그인을 통해 인증을 성공합니다.
2. 인증에 성공하면 principal과 credentials 정보를 Authentication에 담습니다.
3. Spring Security에서 Authentication을 SpringContext에 보관합니다.
4. SpringContext을 SecurityContextHolder에 담아 보관합니다.
d. UserDetails
public interface UserDetails extends Serializable {
    Collection<? extends GrantedAuthority> getAuthorities();

    String getPassword();

    String getUsername();

    default boolean isAccountNonExpired() {
        return true;
    }

    default boolean isAccountNonLocked() {
        return true;
    }

    default boolean isCredentialsNonExpired() {
        return true;
    }

    default boolean isEnabled() {
        return true;
    }
}
인증에 성공하여 생성된 UserDetails 객체는 Authentication 객체를 구현한 UsernamePasswordAuthenticationToken을 생성하기 위해 사용됩니다. UserDetails를 implements 하여 처리할 수 있습니다.
e. UserDetailsService
public interface UserDetailsService {
    UserDetails loadUserByUsername(String username) throws UsernameNotFoundException;
}
UserDetailsService는 UserDetails 객체를 반환하는 하나의 메서드만을 가지고 있는데, 일반적으로 이를 implements 한 클래스에서 UserRepository를 주입받아 DB와 연결하여 처리합니다.
즉, 이곳에서 DB의 사용자 정보를 조회합니다.
f. UsernamePasswordAuthenticationToken
public class UsernamePasswordAuthenticationToken extends AbstractAuthenticationToken {
    private static final long serialVersionUID = 620L;
    private final Object principal;
    private Object credentials;

    public UsernamePasswordAuthenticationToken(Object principal, Object credentials) {
        super((Collection)null);
        this.principal = principal;
        this.credentials = credentials;
        this.setAuthenticated(false);
    }

    public UsernamePasswordAuthenticationToken(Object principal, Object credentials, Collection<? extends GrantedAuthority> authorities) {
        super(authorities);
        this.principal = principal;
        this.credentials = credentials;
        super.setAuthenticated(true);
    }

    public static UsernamePasswordAuthenticationToken unauthenticated(Object principal, Object credentials) {
        return new UsernamePasswordAuthenticationToken(principal, credentials);
    }

    public static UsernamePasswordAuthenticationToken authenticated(Object principal, Object credentials, Collection<? extends GrantedAuthority> authorities) {
        return new UsernamePasswordAuthenticationToken(principal, credentials, authorities);
    }

    public Object getCredentials() {
        return this.credentials;
    }

    public Object getPrincipal() {
        return this.principal;
    }

    public void setAuthenticated(boolean isAuthenticated) throws IllegalArgumentException {
        Assert.isTrue(!isAuthenticated, "Cannot set this token to trusted - use constructor which takes a GrantedAuthority list instead");
        super.setAuthenticated(false);
    }

    public void eraseCredentials() {
        super.eraseCredentials();
        this.credentials = null;
    }
}
Authentication을 implements한 AbstractAuthenticationToken의 하위 클래스로, User의 ID가 Principal 역할을 하고, Password가 Credentials의 역할을 합니다.
UsernamePasswordAuthenticationToken의 첫 번째 생성자는 인증 전의 객체를 생성하고, 두 번째는 인증이 완료된 객체를 생성합니다.
g. AuthenticationManager
인증에 대한 부분은 AuthenticationManager를 통해서 처리하게 되는데, 실질적으로는 AuthenticationManager에 등록된 AuthenticationProvider에 의해 처리됩니다.
인증에 성공하면 두 번째 생성자를 이용해 객체를 생성하여 SecurityContext에 저장합니다.
h. AuthenticationProvider
AuthenticationProvider에서는 실제 인증에 대한 부분을 처리하는데, 인증 전의 Authentication 객체를 받아서 인증이 완료된 객체를 반환하는 역할을 합니다.
4. Spring Security 인증 처리 과정

a. 일반적인 프로세스
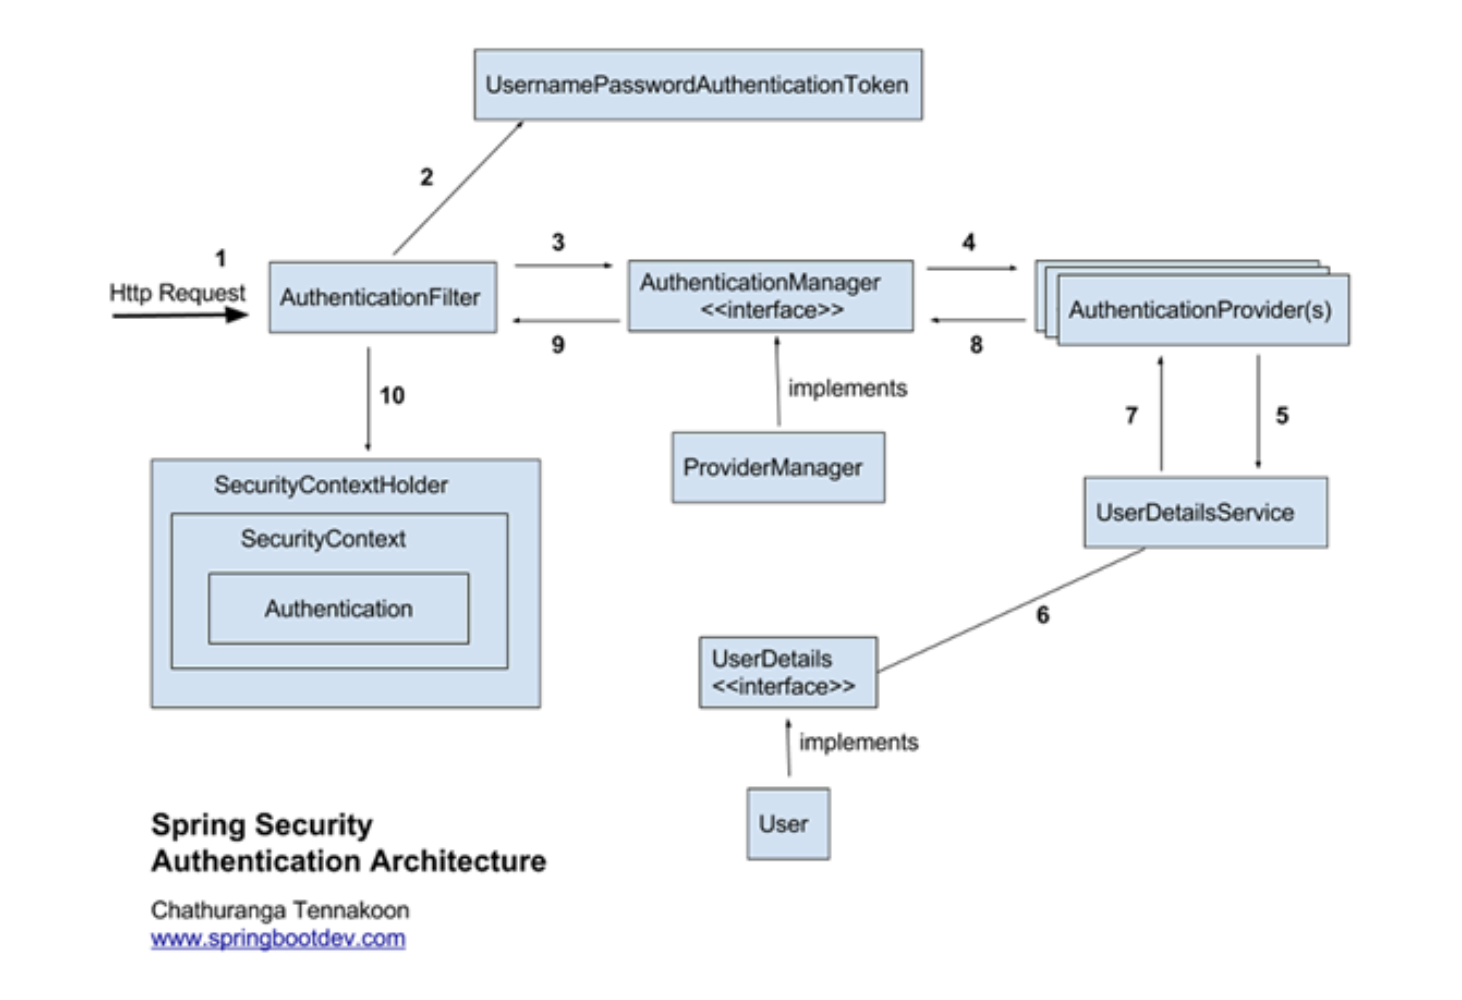
a-1. 클라이언트가 로그인을 시도
a-2. AuthenticationFilter에서 인증을 처리 후 UsernameAuthenticationToken을 발급
Servlet Filter에 의해서 Security Filter로 Security 작업이 위임되고, 여러 Security Filter 중에서 UsernamePasswordAuthenticationFilter에서 인증을 처리합니다.
이후 AuthenticationFilter는 HttpServletRequest에서 아이디와 비밀번호를 추출하여 UsernameAuthenticationToken을 발급합니다.
🤔 Spring 로그인 폼을 사용하지 않는다면?
UsernamePasswordAuthenticationFilter를 사용해 로그인 폼으로 보내집니다.
하지만 로그인 폼을 사용하지 않는다면 사용자 정의 필터를 생성하고 설정해 주면 됩니다.
이전 프로젝트에서 설정했던 코드입니다.
public class JwtAuthenticationFilter extends OncePerRequestFilter { private final JwtTokenProvider jwtTokenProvider; . . }
그리고 SecurityConfig에서 다음과 같은 코드도 추가해 줬습니다.
.addFilterBefore(jwtAuthenticationFilter(), UsernamePasswordAuthenticationFilter.class);
a-3. AuthenticationManager에게 인증 객체 전달
AuthenticationFilter는 AuthenticationManager에게 인증 객체를 전달합니다.
AuthenticationManager는 인증을 담당하기 때문에 2번에서 발급한 토큰이 올바른 유저인지 확인합니다.
a-4. 인증을 위해 AuthenticationProvider에게 인증 객체 전달
a-5. 전달받은 인증 객체의 정보를 UserDetailsService에 전달
AuthenticationProvider는 전달받은 인증 객체의 정보를 UserDetailsService에게 넘겨줍니다.
a-6. UserDetails 구현 객체 생성
UserDetailsService는 전달받은 사용자 정보를 통해 DB에서 알맞은 사용자를 찾고 이를 기반으로 UserDetails을 구현한 객체를 반환합니다.
이때 메서드는 UserDetails을 반환하는 loadUser 메서드 하나입니다.
a-7. UserDetails 객체를 AuthenticationProvider에 전달
a-8. ProviderManager에게 권한을 담은 검증된 인증 객체를 전달
AuthenticationProvider은 전달받은 UserDetails를 인증해 성공하면 ProviderManager에게 권한을 담은 검증된 인증 객체를 전달합니다.
a-9. 검증된 인증 객체를 AuthenticationFilter에게 전달
ProviderManager가 AuthenticationFilter에 전달합니다.
a-10. 검증된 인증 객체를 SecurityContextHolder의 SecurityContext에 저장
AuthenticationFilter가 UserDetails 정보를 SecurityContextHolder에 저장합니다.
5. 로그인 한 사용자 정보 가져오기
a. Bean에서 사용자 정보 가져오기
public static Long getCurrentUserId() {
    Object principal = SecurityContextHolder.getContext().getAuthentication().getPrincipal();
    User currentUser = (User) principal;
    Long userId = currentUser.getId();
    return userId;
}
가장 간단한 전역에 선언된 SecurityContextHolder에서 가져오는 방법입니다.
b. Controller에서 사용자 정보 가져오기
@PostMapping("/{userId}")
public Response<Response> createTodo(
         Principal principal,
         Authentication authentication
         ) {
         .
         .
         .
}
principal 객체뿐만 아니라 Authentication 토큰 또한 가져올 수 있습니다.
c. @AuthenticationPrincipal
@GetMapping("/daily")
public ApiResponse<DailyMissionResDTO> getDailyMission(@AuthenticationPrincipal Long userId){
    .
    .
    .
}
Spring Security 3.2부터는 annotation을 이용하여 현재 로그인한 사용자 객체를 인자에 주입할 수 있습니다.
'Programming > Spring' 카테고리의 다른 글
| [Spring] 동시성 처리 (18) | 2024.11.15 |
|---|---|
| [Spring] Security + JWT + OAuth2를 이용한 로그인 구현 (5) - OAuth2.0 로그인 관련 클래스 생성 (0) | 2024.11.12 |
| [Spring] Security + JWT + OAuth2를 이용한 로그인 구현 (4) - OAuth란? (0) | 2024.11.06 |
| [Spring] Security + JWT + OAuth2를 이용한 로그인 구현 (2) - JWT 관련 클래스 생성 / JWT 인증 로직 (0) | 2024.10.29 |
| [Spring] Security + JWT + OAuth2를 이용한 로그인 구현 (1) - JWT란? (0) | 2024.10.29 |